Configure Allocations Using Models
Allocation Models are made up of allocation structures that allow users to select funds according to a pre-determined strategy. Models are templates of funds or other portfolios that are grouped together with a certain investment goal.
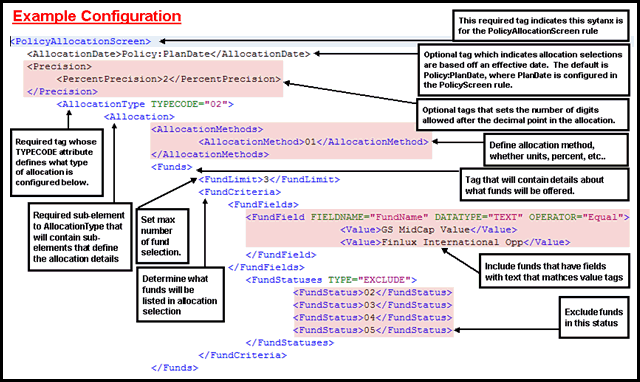
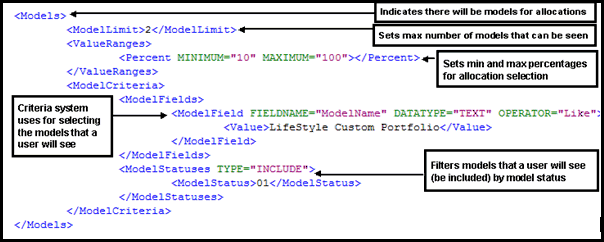
An explanation of the types of models supported in OIPA is provided in the Allocation Model section of this help. An XMLexample of the OIPA PolicyAllocationScreen business rule configuration is also provided.
A model in OIPA is a template of selected fund allocations that can be actual funds or the ability to select funds that are in predetermined asset classes. To configure allocation models in OIPA, a plan must support the use of models. If asset class models are used, then funds must also be associated with fund asset classes. After these two preliminary steps are complete, the allocation model must be configured. Then it can be associated to an allocation structure. Multiple models can be created for a plan, as they can be used in different scenarios, such as the creation of an aggressive or conservative model. The final step is to associate the models with the plans that will use them.
When using fund asset classes and/or models, all previous versions of OIPA must follow these steps. Upgrades from V7 and V8 will have to go through the process of setting up funds, fund asset classes and models as listed below. If upgrading to V9 and the products only used straight funds, then refer to the section called Configure Allocations Using Default Method .
High Level Steps to Configure Allocation Models
- In the New Plan Wizard or Plan Maintenance screen, select Model Supported for the plan allocation method.
- Set up the funds that will be used in the allocation.
- Create a new allocation model.
- Configure the allocation model.
-
Associate the allocation model with a plan.
-
Add the allocation model in the appropriate business rule (PolicyAllocationScreen or TransactionAllocationScreen) according to where the allocation model will be used in OIPA.
-
Test OIPA to ensure all the configuration works.
Steps to Configure Allocation Models
-
Create a new plan using the Plan Wizard and select Model Supported as the plan allocation method. If a plan already exists, then right-click on the plan in the Main Explorer and select Edit Plan. Select Model Supported for the plan allocation method.
-
Set up the funds that will be used in the allocation. The model will have predetermined funds already selected for the policy owner unless an owner is able to select the funds according to predetermined fund classes. In either case, proper set up is important.
-
Fund Allocation Model: if setting up an allocation model that uses determined funds, refer to the Create Funds section for further information.
-
Fund Asset Class Allocation Model: if setting up allocations that use fund asset classes, refer to the Fund Asset Classes section for information on how to create associations between funds and asset classes.
-
-
Create a new Allocation Model.
-
Navigate to the Admin Explorer and open Administration | Allocation Models. The Allocation Models node is pre-populated with all existing Primary Companies.
-
Right-click on the Allocation Models node and select Add New Allocation Model.
-
In the wizard, enter the following information:
-
Company: Select the company that will use this model.
-
Model Name: Enter an identifiable name for the model.
-
Model Type: Following three Model types are available:
- Non-Asset Class Model: If using specific funds for the allocation model.
- Asset Class Model: If using Fund Asset Classes.
- Unlocked Asset Class Model: If using dynamic Asset Class allocations in addition to dynamic fund allocations.
Note These Model type values come from AsCodeModelType and are system codes. -
Model Category: Select the category. Model category values come from AsCodeModelCategory of AsCode table.
-
Model Description: Enter a description. This is optional and can include additional information about the model.
-
Effective Date: The default is the present day's date but a different date can be used.
-
Expiration Date: This is blank and may be left blank if there is no expiration date for the model. A future date can be entered.
-
Fund Percent Lock: If this checkbox is checked, then the total percentage of all funds must equal 100% and the Model cannot be edited in OIPA. If this checkbox is un-checked, then total percentage of all funds must be equal to, or less than 100%, and the Model may be edited in OIPA. Percent Lock information is stored in database AsModelDefinition table’s PercentLock column.
Important When creating Unlocked Asset Class Model, make sure that the Fund Percentage Lock is unchecked. -
Select Finish. The new model sub-node will be added to the Primary Company node. The newly added model node will also have a contextual menu sub-node with the same name as the newly-created model. The newly-created contextual sub-node’s look and feel will emulate that of a newly created business rule (or transaction) before it is checked-in: it will be blue, and its content will be editable in the Model Grid pane on the right.
-
-
Check-In and Check-Out the model that was created in the Admin Explorer window to commit it to the database.
-
-
Configure the Allocation Model Details.
- Add a Variant under Model Variants if necessary. A variant is a version of the base model. Each model may have any number of versions. Model variants (versions) can be added, deleted and expired based on Effective / Expiration dates. Only one Model Variant can be active at a time. When a Model is first created, there will always be at least one Variant record in this section. The record will contain Variant Effective Date field (with date from the “New Allocation Model” wizard) and Variant Expiration Date.
-
Select the variant the model will use. The dates will be highlighted blue for the variant that is selected.
- Create the model.
- If using The Non Asset Class Model:
Select the Add Fund button for each fund in the model.
- Select each fund from the drop-down box that should be included in the model.
- Enter the fund percent for each fund. Make sure the aggregate is 100%.
- Check in the file when complete.
- If using the Asset Class Model:
Select the Add Asset Class button for each asset class in the model.
Select the Asset Class name. The Fund field will remain disabled until an Asset Class is selected.
- Enter a Percent for each Asset Class. The total percentage of all Asset Classes must add to 100%.
- Select Add Fund for each fund that will be associated with the Asset Class. The Asset Class field filters this field so that only funds associated with that Asset Class will be available.
- For each record, select the Asset Class and fund and then enter a percent. All percentages must equal the percent selected for the Asset Classes.
Select the Add Fund button to identify specific funds that will be available.
- Select the Asset Class.
- Select the Fund Name.
- Enter a Percent.
- Check in the file when complete.
- If using the Unlocked Asset Class Model:
Select the Add Asset Class button for each asset class in the model.
Select the Asset Class name. The Fund field will remain disabled until an Asset Class is selected.
- Enter a Percent for each Asset Class. you can also set the Asset Class value as Zero. It is not mandatory to have the sum of total percentage of all Asset Classes as 100%.
- Select Add Fund for each fund that will be associated with the Asset Class. The Asset Class field filters this field so that only funds associated with that Asset Class will be available.
- Enter the fund percentage as required. The sum of the fund percentages automatically gets updated as the associated asset class percentage.
Select the Add Fund button to identify specific funds that will be available.
- Select the Asset Class.
- Select the Fund Name.
- Enter a Percent.
- Check in the file when complete.
- If using The Non Asset Class Model:
-
Associate the allocation model with a plan.
-
Navigate to the Admin Explorer and open Administration | Allocation Models | Subsidiary Companies | Company | Plan.
-
Right-click on the plan node and select Add Plan Model Link.
-
The Plan/Model Link Wizard opens. Enter the following information:
-
Allocation Model: Select the model to link to the plan.
-
Effective Date: Enter a date and select any variants. Make sure the dates coincide.
-
Expiration Date: This is optional.
-
Status: Select the status of the model.
-
Select Finish.
-
Check in the new Plan Link from the Admin Explorer window.
-
-
Add another plan model status if necessary from this pane.
-
-
Add the Allocation Model in the appropriate business rule (PolicyAllocationScreen or TransactionAllocationScreen) according to where the model will be used in OIPA. These business rules store the allocation instructions for the varying allocations that may be presented at the different levels in OIPA.
-
Check allocations in OIPA to ensure they have been configured properly. Navigate to the appropriate screen depending on the configuration:
- Policy Allocations:Locate or create a policy, then use the Left Navigation Allocations link.
- Transaction Allocations: Locate the activity on the Activity screen that is associated with the transaction that was configured.
- Plan Allocations:Please see the AllocationScreen business rule and the Plan Data page.

Basic Allocation Configuration and Fund Selection

Configuration Showing Allocations in Models
